
Safely integrate vendor applications in your production AWS environment
How to create, monitor, and control access to externally-operated AWS accounts in your organization

Imagine this scenario: You launched a application on AWS that serves external users and are closely following security, identity, and compliance best practices. You maintain a strict separation between your Internet-facing marketing site and external APIs and internal resources that store or process sensitive data. Access to this internal environment is infrequent and limited to a select few employees. You leverage security controls like CI/CD scanning to control which software is deployed to this environment and manage supply chain risks. Draw a box around this internal environment. This is a trust boundary within your threat model that guides your decision making around security controls and data governance.
Next, you learn that there is a requirement to contract with external vendors for processing sensitive data and to outsource authentication and authorization functions. The vendor may ask you to send data to their platform or integrate their platform with your application. One common pattern is to thoroughly vet the vendor and evaluate the risk vs. reward tradeoff. The result is some combination of:
The vendor meets your requirements and is trusted based on the representations made in the vetting process.
You ask the vendor to agree to data handling standards and mitigations like maintaining an isolated, single-tenant environment.
You ask the vendor to operate within your trust boundary.
In this post I propose a solution that you can build on AWS to operate vendor managed applications within your trust boundary for higher risk use cases.
Use Cases
There are cases where integrating a third-party managed application introduces an outsized degree of risk. For example:
The application processes payment card information (PCI) or sensitive personal information (SPI) like identification numbers, biometrics, or healthcare data.
The application manages secrets like passwords, cryptographic keys, or system parameters.
The application scans cloud or system configuration using Identity and Access Management (IAM) privileges granted to the vendor.
For use cases like these you should work with your vendor to deploy a dedicated instance of the application within your existing trust boundary so that it inherits a uniform set of security controls and configurations that is aligned with the rest of your organization.
Solution
This solution is an AWS architecture that allows you to segregate workloads, safely grant access to external entities like vendors, apply centralized guardrails, centralize logging and security monitoring, and respond to security incidents by automating containment actions. To implement this solution you will need a broad, intermediate level knowledge of AWS and strong change control discipline. You will also need to collaborate with your partners in product engineering teams and across security teams like cloud security, incident response, and compliance. This helps ensure that your specific implementation and change control plan meet the unique needs of the organization.
The following high-level architecture diagram (Figure 1) depicts workload segregation, cross-account and cross-organization role assumption, and incident containment workflows:
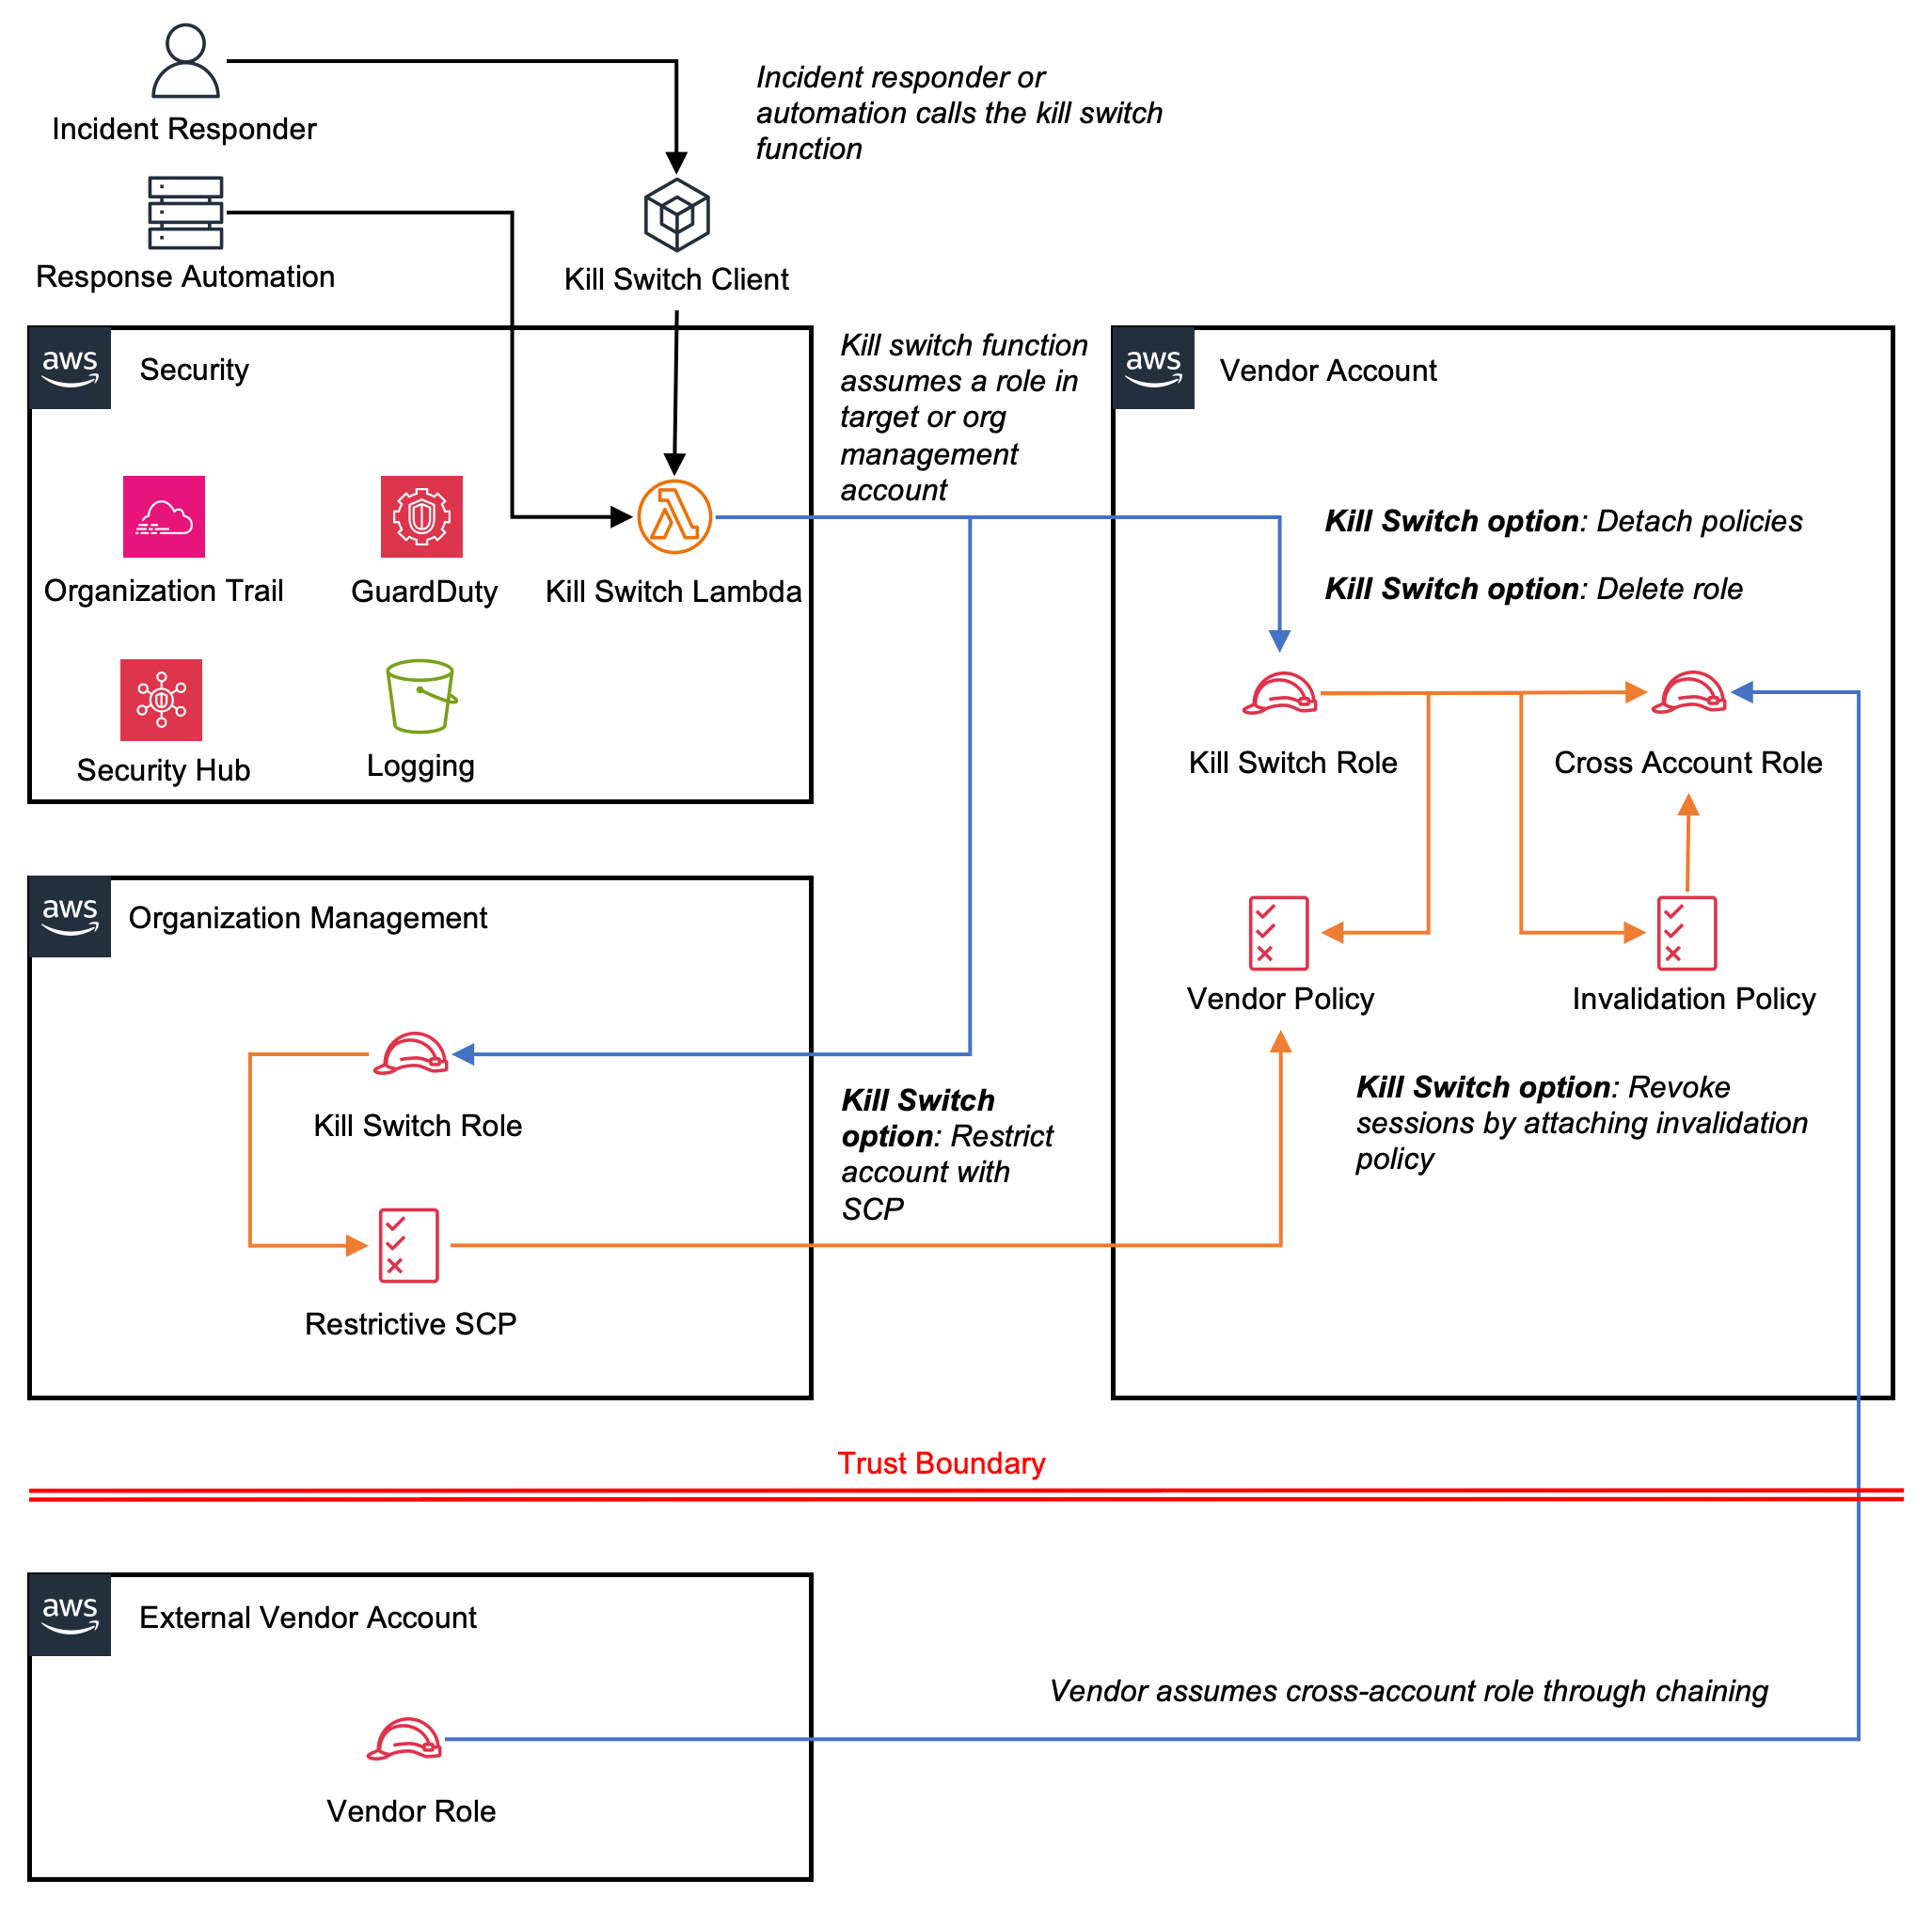
Figure 1. High level organization architecture, across account/org access, and incident response workflows.
Here is a deeper look at specific elements of this solution:
Organizational unit (OU) is created to group vendor accounts and a Service Control Policy (SCP) places broad and uniform limits on vendor actions.
Vendor accounts are created within your AWS Organization and managed by a separate (new or existing) security account.
Cross-account role is created within an inline policy to grant the vendor the ability to assume role from their own account and perform a limited set of actions.
AWS CloudTrail and Amazon GuardDuty are centrally managed to provide you with an audit trail and security findings for any account in your organization.
AWS Security Hub provides your security engineers with a centralized view of all security findings.
Additional SCPs protect your security controls by blocking administrative CloudTrail, Guard Duty, and Security Hub actions, blocking changes to certain roles required by Security, and preventing an account from leaving the organization.
Kill switch AWS Lambda function immediately disables vendor access from a Security account in case of an incident where it is necessary to lockout the vendor.
Tips:
Run all commands from your organization management account with
AdministratorAccess(or similar) permissions, unless otherwise noted.Practice this in a test environment. Do not test in production.
Let’s build!
Part 1: Create and configure your organization
This solution assumes that you have an existing organization in AWS Organizations. Follow this tutorial to create one, if needed. Do not use an existing production account as the organization management account. The management account should be dedicated to this purpose and only a small number of highly trusted users should have access. The account where you create your organization becomes the management account and this cannot be changed.
You will need to give AWS CloudFormation StackSets permission to manage resources in your AWS accounts:
aws cloudformation activate-organizations-accessThe organization management account will also need a AWSCloudFormationStackSetAdministrationRole. Create an IAM role defined in stackset_admin_role.json:
{
  "Version": "2012-10-17",
  "Statement": [
    {
      "Effect": "Allow",
      "Principal": {
        "Service": "cloudformation.amazonaws.com"
      },
      "Action": "sts:AssumeRole"
    }
  ]
}
and attach the AdministratorAccess managed policy:
aws iam attach-role-policy \
  --role-name AWSCloudFormationStackSetAdministrationRole \
  --policy-arn arn:aws:iam::aws:policy/AdministratorAccess
Next, create a service managed StackSet that you will apply to your organization root to ensure that all newly created accounts have the AWSCloudFormationStackSetAdministrationRole. Create a template called stackset_admin_role.yml:
AWSTemplateFormatVersion: '2010-09-09'
Description: Execution role for AWS CloudFormation StackSets

Resources:
  StackSetExecutionRole:
    Type: 'AWS::IAM::Role'
    Properties:
      RoleName: AWSCloudFormationStackSetExecutionRole
      AssumeRolePolicyDocument:
        Version: '2012-10-17'
        Statement:
          - Effect: Allow
            Principal:
              AWS:
                - arn:aws:iam::${management_account}:role/AWSCloudFormationStackSetAdministrationRole
            Action:
              - 'sts:AssumeRole'
      ManagedPolicyArns:
        - arn:aws:iam::aws:policy/AdministratorAccess
Create the StackSet:
aws cloudformation create-stack-set \
  --stack-set-name CreateExecutionRole \
  --template-body file://stackset_admin_role.yml \
  --permission-model SERVICE_MANAGED \
  --auto-deployment Enabled=true,RetainStacksOnAccountRemoval=false --capabilities CAPABILITY_NAMED_IAM \
--parameters ParameterKey=management_account,ParameterValue={management_account},UsePreviousValue=false
Find your organization root:
aws organizations list-rootsand apply:
aws cloudformation create-stack-instances \
  --stack-set-name CreateExecutionRole \
  --regions '["us-east-1"]' \
  --deployment-targets OrganizationalUnitIds='["{root_id}"]'
Part 2: Create a security account to monitor vendor accounts
Create a new AWS account to act as a security account for your organization. Like the organization management account, the security account should be limited to a small number of highly trusted users who are responsible for managing and monitoring the organization’s security controls. You can use the AWS CLI to create this account in your organization:
aws organizations create-account --email "email@example.com" --account-name "Security account"Be sure to replace the e-mail address with something valid for your organization. A common pattern is to use “plus addressing” to label aggregate many accounts into a single mailbox. For example, you might use aws+management@example.com, aws+security@example.com, aws+app-prod-iad@example.com, etc. to route all account mail to aws@example.com.
When you created this account an OrganizationAccountAccessRole was automatically created. This role has the AdministratorAccess managed policy attached and can be assumed from the organization management account for any actions that you need to perform in the security account.
Next, use an AWS CloudFormation StackSet to create a role that can be assumed by security engineers in your organization. This will require you to create a template called security_account_role.yml , which defines the role and its attached policy:
Resources:
  MySecurityRole:
    Type: AWS::IAM::Role
    Properties:
      RoleName: "SecurityRole"
      AssumeRolePolicyDocument:
        Version: "2012-10-17"
        Statement:
          -
            Effect: "Allow"
            Principal:
              AWS: "{security_principals}"
            Action:
              - "sts:AssumeRole"
      Policies:
        -
          PolicyName: "SecurityEngineeringPolicy"
          PolicyDocument:
            Version: "2012-10-17"
            Statement:
              -
                Effect: "Allow"
                Action:
                  - "s3:CreateBucket"
                  - "s3:GetObject"
                  - "s3:ListBucket"
                  - "s3:PutObject"
                  - "guardduty:*"
                  - "securityhub:*"
                  - "cloudtrail:*"
                Resource: "*"
The actions allowed by the policy in this StackSet include many actions in S3 and full access to GuardDuty, Security Hub, and CloudTrail. Modify these actions as appropriate to suit your organization’s unique requirements. In a later section I will cover how to use service control policies (SCPs) to block actions like disabling a detector or trail.
Your security engineers can assume this role for routine tasks related to monitoring the security posture of your organization. Update {security_principals} to include any principals that should be able to assume this role. You should also change the set of actions to suit your unique requirements.
Now you can create the StackSet:
aws cloudformation create-stack-set \
  --stack-set-name SecurityAccountRole \
  --template-body file://security_account_role.yml \
  --capabilities CAPABILITY_NAMED_IAM
and deploy it to your security account:
aws cloudformation create-stack-instances \
  --stack-set-name SecurityAccountRole \
  --accounts '["{security_account}"]' \
  --regions '["us-east-1"]'
Part 3: Configure organization security controls
In this section you will configure the following security features:
CloudTrail enabled on all accounts from the management account and delegated to the security account.
GuardDuty enabled on all accounts from the management account and delegated to the security account.
Security Hub enabled from the management account and delegated to the security account.
Create logging buckets
You will create a logging bucket for CloudTrail and GuardDuty in the security account to serve as an audit trail for all calls and findings generated by the respective services. Each bucket will have a bucket policy that allows the service to PutObject. Create a CloudFormation template called security_buckets.yml:
AWSTemplateFormatVersion: '2010-09-09'
Description: Create centralized logging buckets in a security account.

Resources:

  CloudTrailBucket:
    Type: AWS::S3::Bucket
    Properties:
      BucketName:
        Fn::Sub: "cloudtrail-${AWS::AccountId}"
      ObjectLockEnabled: true
      VersioningConfiguration:
        Status: "Enabled"
      LifecycleConfiguration:
        Rules:
        - Id: MoveToGlacierAndExpire
          Status: Enabled
          Transitions:
            - TransitionInDays: 30
              StorageClass: GLACIER
          ExpirationInDays: 2555

  GuardDutyBucket:
    Type: AWS::S3::Bucket
    Properties:
      BucketName:
        Fn::Sub: "guardduty-${AWS::AccountId}"
      ObjectLockEnabled: true
      VersioningConfiguration:
        Status: "Enabled"
      LifecycleConfiguration:
        Rules:
        - Id: MoveToGlacierAndExpire
          Status: Enabled
          Transitions:
            - TransitionInDays: 30
              StorageClass: GLACIER
          ExpirationInDays: 2555

CloudTrailBucketPolicy:
  Type: AWS::S3::BucketPolicy
  Properties:
    Bucket: !Ref CloudTrailBucket
    PolicyDocument:
      Version: '2012-10-17'
      Statement:
        - Effect: Allow
          Principal:
            Service: cloudtrail.amazonaws.com
          Action:
            - s3:PutObject
          Resource:
            - !Sub "${CloudTrailBucket.Arn}/*"
          Condition:
            StringEquals:
              s3:x-amz-acl: "bucket-owner-full-control"
        - Effect: Allow
          Principal:
            Service: cloudtrail.amazonaws.com
          Action:
            - s3:GetBucketAcl
          Resource:
            - !Sub "${CloudTrailBucket.Arn}"

GuardDutyBucketPolicy:
  Type: AWS::S3::BucketPolicy
  Properties:
    Bucket: !Ref GuardDutyBucket
    PolicyDocument:
      Version: '2012-10-17'
      Statement:
        - Effect: Allow
          Principal:
            Service: guardduty.amazonaws.com
          Action:
            - s3:PutObject
          Resource:
            - !Sub "${GuardDutyBucket.Arn}/*"
          Condition:
            StringEquals:
              s3:x-amz-acl: "bucket-owner-full-control"
        - Effect: Allow
          Principal:
            Service: guardduty.amazonaws.com
          Action:
            - s3:GetBucketAcl
          Resource:
            - !Sub "${GuardDutyBucket.Arn}"
This template creates centralized buckets for CloudTrail and GuardDuty. The objects are moved to Amazon S3 Glacier long-term storage after 30 days and are deleted after 7 years (2,555 days). Adjust these values based on your unique compliance requirements.
Create the StackSet that can be deployed to the security account:
aws cloudformation create-stack-set \
  --stack-set-name SecurityBuckets \
  --template-body file://security_buckets.yml
and deploy:
aws cloudformation create-stack-instances \
  --stack-set-name SecurityBuckets \
  --accounts '["{security_account}"]' \
  --regions '["us-east-1"]'
Optionally, use the CLI to set an object lock configuration with COMPLIANCE mode on each of your buckets. This ensures that objects cannot be deleted for a period of time informed by your compliance requirements. You can also choose GOVERNANCE if you want to restrict deletion from all but the root account. Only choose this option if you may want to delete logs early and do not have a requirement to prove that logs are immutable. You must assume the OrganizationAccountAccessRole in your security account before you can set an object lock configuration:
aws sts assume-role \
  --role-arn "arn:aws:iam::  {security_account}:role/OrganizationAccountAccessRole" \
  --role-session-name "OrganizationAccountAccess" \
  --query "Credentials.[AccessKeyId,SecretAccessKey,SessionToken]" \
  --output text
This command will return AccessKeyId, SecretAccessKey, and SessionToken. Set these values as environment variables:
export AWS_ACCESS_KEY_ID={AccessKeyId}
export AWS_SECRET_ACCESS_KEY={SecretAccessKey}
export AWS_SESSION_TOKEN={SessionToken}Tip: When you’re ready to clear this session you can unset each of these keys.
The following commands will lock objects in each of your buckets for 7 years. Adjust the rules as needed to suit your organization’s unique requirements:
aws s3api put-object-lock-configuration --bucket cloudtrail-{security_account} --object-lock-configuration '{"ObjectLockEnabled": "Enabled", "Rule": {"DefaultRetention": {"Mode": "COMPLIANCE", "Days": 2555}}}'

aws s3api put-object-lock-configuration --bucket guardduty-{security_account} --object-lock-configuration '{"ObjectLockEnabled": "Enabled", "Rule": {"DefaultRetention": {"Mode": "COMPLIANCE", "Days": 2555}}}'
Enable AWS CloudTrail
To enable CloudTrail for your entire organization you must first activate trusted access with Organizations:
aws organizations enable-aws-service-access --service-principal cloudtrail.amazonaws.comNext, use CLI to create and enable an organization trail that sends API activity for every account in your organization to the security bucket:
aws cloudtrail create-trail \
  --name "OrganizationTrail" \
  --s3-bucket-name "cloudtrail-{security_account}" \
  --is-organization-trail \
  --is-multi-region-trail \
  --enable-log-file-validation

aws cloudtrail start-logging --name "OrganizationTrail"
and designate your Security account the CloudTrail delegated administrator:
aws cloudtrail register-organization-delegated-admin
  --member-account-id="{security_account}"
Enable Amazon GuardDuty & AWS Security Hub
You can use the CLI to enable GuardDuty for the organization and send findings to both S3 and Security Hub. First, activate trusted access with Organizations:
aws organizations enable-aws-service-access --service-principal guardduty.amazonaws.com

aws organizations enable-aws-service-access --service-principal securityhub.amazonaws.com
Designate an organization admin account, create a GuardDuty detector for each AWS region where you operate, and enable for all new and existing accounts:
aws guardduty enable-organization-admin-account --admin-account-id {security_account} --region us-east-1

aws guardduty create-detector --enable

aws guardduty update-organization-configuration --detector-id {detector_id} --auto-enable --region us-east-1
Update your detector to exporting findings to the GuardDuty S3 bucket that you created:
aws guardduty update-detector \
  --detector-id {detector_id} \
  --enable \
  --s3-bucket guardduty-{security_account} \
  --region {region}
Next, activate Security Hub for your organization and designate an organization admin account. Run these commands from the organization management account:
aws securityhub enable-organization-admin-account --admin-account-id {security_account}

aws securityhub enable-security-hub --region {region}
and run this command from the Security account:
aws securityhub update-organization-configuration --auto-enable --region {region}This will enable Security Hub for the specified region. Run the enable-security-hub and update-organization-configuration commands again for each of the AWS regions where you operate.
Part 5: Apply service control policies
You can protect your security controls by applying a service control policy (SCP) that limits certain actions in your organization. In this solution you will create three SCPs:
Limit CloudTrail, GuardDuty, and Security Hub actions to the Security account
Prevent tampering with the StackSets execution role and organization account access roles that are automatically deployed to every account in your organization.
Prevent any account from leaving the organization
Limit certain actions to the Security account
This SCP will restrict CloudTrail, GuardDuty, and Security Hub actions to the security account. It adds defense-in-depth to your IAM policies and prevents accidental over-scoping.
Let’s call this configuration protectcontrols_scp.json:
{
  "Version": "2012-10-17",
  "Statement": [
    {
      "Effect": "Allow",
      "Action": [
        "cloudtrail:LookupEvents",
        "cloudtrail:GetTrailStatus",
        "cloudtrail:DescribeTrails",
        "cloudtrail:GetEventSelectors",
        "cloudtrail:ListTags",
        "cloudtrail:ListTrails",
        "securityhub:GetFindings",
        "securityhub:BatchUpdateFindings",
        "securityhub:DescribeHub",
        "securityhub:ListEnabledProductsForImport",
        "securityhub:ListFindings",
        "securityhub:ListInvitations",
        "securityhub:ListMembers",
        "guardduty:GetFindings",
        "guardduty:ListFindings",
        "guardduty:GetDetector",
        "guardduty:DescribePublishingDestination"
      ],
      "Resource": "*"
    },
    {
      "Effect": "Deny",
      "NotAction": [
        "cloudtrail:LookupEvents",
        "cloudtrail:GetTrailStatus",
        "cloudtrail:DescribeTrails",
        "cloudtrail:GetEventSelectors",
        "cloudtrail:ListTags",
        "cloudtrail:ListTrails",
        "securityhub:GetFindings",
        "securityhub:BatchUpdateFindings",
        "securityhub:DescribeHub",
        "securityhub:ListEnabledProductsForImport",
        "securityhub:ListFindings",
        "securityhub:ListInvitations",
        "securityhub:ListMembers",
        "guardduty:GetFindings",
        "guardduty:ListFindings",
        "guardduty:GetDetector",
        "guardduty:DescribePublishingDestination"
      ],
      "Resource": "*",
      "Condition": {
        "StringNotEquals": {
          "aws:PrincipalAccount": "{security_account}"
        }
      }
    }
  ]
}
Check the AWS Documentation for CloudTrail, GuardDuty, and Security Hub and confirm that the list of actions provided in this solution are suitable for your organization.
Before you can use SCPs this feature must be enabled for your organization root:
aws organizations list-roots

aws organizations enable-policy-type --root-id {root_id} --policy-type SERVICE_CONTROL_POLICY
Now create and attach the SCP:
aws organizations create-policy \
    --content file://protectcontrols_scp.json \
    --description "Limit security controls to the security account" \
    --name "ProtectSecurityControls" \
    --type SERVICE_CONTROL_POLICY

aws organizations attach-policy --policy-id {scp_id} --target-id "{root_id}"
Prevent tampering with certain roles
In this solution there are three roles that are automatically deployed to every account in your organization. These roles (OrganizationAccountAccessRole, AWSCloudFormationStackSetAdministrationRole, and AllowSecurityDetachRoleRole (which you will create later)) are necessary for break glass access to accounts, deployment of StackSets, and actions that you may take during a security incident. It is crucial that these roles are protected against unauthorized changes that could render them inoperable.
This SCP will prevent deletion of these three roles (or detaching or deleting policies from these roles) for all accounts in the organization. Let’s call this preventtampering_scp.json:
{
  "Version": "2012-10-17",
  "Statement": [
    {
      "Sid": "ProtectSpecificRoles",
      "Effect": "Deny",
      "Action": [
        "iam:DeleteRole",
        "iam:DetachRolePolicy",
        "iam:DeleteRolePolicy"
      ],
      "Resource": [
        "arn:aws:iam::*:role/OrganizationAccountAccessRole",
"arn:aws:iam::*:role/AWSCloudFormationStackSetAdministrationRole",
        "arn:aws:iam::*:role/AllowSecurityDetachRoleRole"
      ]
    }
  ]
}
Create the SCP and attach to your organization root:
aws organizations create-policy \
  --content file://preventtampering_scp.json \
  --description "Protect administrative roles" --name "PreventTamperingSCP" --type SERVICE_CONTROL_POLICY

aws organizations attach-policy --policy-id {scp_id} --target-id {root_id}
Prevent accounts from leaving the organization
If a threat actor wants to get around a SCP they might try to leave your organization. You can prevent this by blocking the LeaveOrganization action. Let’s call this leaveorganization_scp.json:
{
  "Version": "2012-10-17",
  "Statement": [
    {
      "Effect": "Deny",
      "Action": "organizations:LeaveOrganization",
      "Resource": "*"
    }
  ]
}
Create the SCP and attach to your organization root:
aws organizations create-policy \
  --content file://leaveorganization_scp.json \
  --description "Prevent LeaveOrganization" --name "LeaveOrganizationSCP" --type SERVICE_CONTROL_POLICY

aws organizations attach-policy --policy-id {scp_id} --target-id {root_id}
Part 6: Create a vendor organizational unit
With Organizations you can create organizational units (OUs) to group accounts that should share a common posture. Let’s create a “Vendors” OU to group any accounts that we will create on behalf of vendors. First, find your organization root ID:
aws organizations list-rootsthen create the Vendors OU:
aws organizations create-organizational-unit --parent-id {root_id} --name "Vendors"Next, create a SCP that limits the regions and services that your vendors can use. This should mirror the regions that you already use (or where you want to restrict your vendors) and limit the AWS services that vendors can collectively access. Let’s call it vendor_scp.json:
{
  "Version": "2012-10-17",
  "Statement": [
    {
      "Effect": "Deny",
      "Action": "*",
      "Resource": "*",
      "Condition": {
        "StringNotEqualsIfExists": {
          "aws:RequestedRegion": ["us-east-1", "us-west-2"]
        }
      }
    },
    {
      "Effect": "Allow",
      "Action": [
        "iam:GetRole",
        "iam:AssumeRole",
        "ec2:*",
        "elasticloadbalancing:*",
        "s3:*",
        "sns:*",
        "sqs:*",
        "lambda:*",
        "route53resolver:*"
      ],
      "Resource": "*"
    }
  ]
}
This SCP will restrict your vendors to assuming cross-account roles and using AWS services EC2, S3, ELB, SQS, SNS, Lambda, and Route 53 Resolver in the us-east-1 and us-west-2 regions. Update this to meet the unique needs of your organization, create, and attach to your OU:
aws organizations create-policy \
  --content file://vendor_scp.json \
  --description "Restrictions for the Vendors OU" \
  --name "Vendor SCP" --type SERVICE_CONTROL_POLICY

aws organizations attach-policy --policy-id {scp_id} --target-id {vendors_ou_id}
Use the ID that was returned when you created the SCP and the OU ID that was returned when you created your OU. You can run list-roots again if needed to find this ID.
Each of your vendors will need a cross-account role that they can assume from one of the roles in their account. Ask each vendor to provide an IAM principal that they will use to assume role. For the sake of this solution let’s create a vendor called Acme Vendor and create the account in the Vendors OU:
aws organizations create-account --email "vendor@acmevendor.com" --account-name "Acme Vendor"

aws organizations move-account --account-id {acme_vendor_id} --source-parent-id {root_id} --destination-parent-id {vendors_ou_id}
Now we will create a cross-account role and inline policy for the vendor. They will have all of the permissions allowed by the SCP except Lambda. Let’s create acme_vendor_iam.yml:
Resources:
  VendorRole:
    Type: AWS::IAM::Role
    Properties:
      RoleName: "AcmeVendorRole"
      AssumeRolePolicyDocument:
        Version: "2012-10-17"
        Statement:
          - Effect: "Allow"
            Principal:
              AWS: "${vendor_principal}"
            Action:
              - "sts:AssumeRole"
      Policies:
        - PolicyName: "AcmeVendorPolicy"
          PolicyDocument:
            Version: "2012-10-17"
            Statement:
              - Effect: "Allow"
                Action: [
                 "iam:GetRole",
                 "iam:AssumeRole",
                 "ec2:*",
                 "elasticloadbalancing:*",
                 "s3:*",
                 "sns:*",
                 "sqs:*",
                 "route53resolver:*"
                ]
                Resource: "*"
Name the CloudFormation resource, role, and policy, insert the vendor’s IAM role as the principal, and create a StackSet:
aws cloudformation create-stack-set \
  --stack-set-name AcmeVendorRoleStackSet \
  --template-body file://acme_vendor_iam.yml \
  --capabilities CAPABILITY_NAMED_IAM \
  --parameters ParameterKey=vendor_principal,ParameterValue={vendor_principal},UsePreviousValue=false
and deploy to the vendor’s account:
aws cloudformation create-stack-instances \
  --stack-set-name AcmeVendorRoleStackSet \
  --accounts '["{acme_vendor_id}"]' \
  --regions '["us-east-1"]'
This policy is more restrictive than the SCP. If you tried giving the vendor access to a service not previously defined, they would be blocked by the SCP.
You will need the ARN of the role that was just created for the next step. You can obtain this by assuming OrganizationAccountAccessRole in {acme_vendor_id} and running aws iam list-roles.
Testing cross-account access
It is up to the vendor to decide how to assume the role you created and deploy their application. They can test the role by using their own IAM role to obtain temporary credentials for the role that you provisioned. First, they should assume the role in their own account:
aws sts assume-role \
  --role-arn "{vendor_principal}" \
  --role-session-name "VendorSession" \
  --query "Credentials.[AccessKeyId,SecretAccessKey,SessionToken]" \
  --output text
then export Credentials as environment variables:
export AWS_ACCESS_KEY_ID="{NewAccessKeyId}"
export AWS_SECRET_ACCESS_KEY="{NewSecretAccessKey}"
export AWS_SESSION_TOKEN="{NewSessionToken}"
Next, they assume the role you created:
aws sts assume-role \
  --role-arn "{AcmeVendorRole}" \
  --role-session-name "VendorSession" \
  --query "Credentials.[AccessKeyId,SecretAccessKey,SessionToken]" \
  --output text
Export credentials one more time:
export AWS_ACCESS_KEY_ID="{NewAccessKeyId}"
export AWS_SECRET_ACCESS_KEY="{NewSecretAccessKey}"
export AWS_SESSION_TOKEN="{NewSessionToken}"
Now they can confirm that they have correctly assumed the role:
aws sts get-caller-identityThis should return the AWS account ID that you provisioned for the vendor’s use.
Part 7: Create a kill switch
You may wonder why you created a cross-account role to be assumed by another role outside of your organization. This approach lets your vendor safely integrate the account with their own deployment tooling and identity management while maintaining isolation from your own IAM and identity provider integrations. It also makes it easy for you to isolate the application in a security incident without having to worry about individual users or active sessions.
Let’s create a “kill switch” that provides your security engineers (or security automations) with the ability to deny:
Any action from your vendor. This is useful as a precaution if your vendor declares a security incident or if you suspect that your vendor is compromised.
Any action regardless of role. This is useful if you suspect a production compromise and want to make that account immutable.
We will achieve this by creating two IAM roles that can apply SCPs at the organization root (or Vendors OU) and detach IAM policies and delete inline policies anywhere in the organization.
Allow security account to apply SCPs
You can allow the Security account to apply SCPs anywhere in the organization by creating a role in the organization management account that any user in the security account can assume. Let’s call this role allow_security_scp.yml:
AWSTemplateFormatVersion: '2010-09-09'
Description: 'Role to allow SCP placement by Security account'

Resources:
  AllowSecuritySCPRole:
    Type: 'AWS::IAM::Role'
    Properties:
      RoleName: 'AllowSecuritySCPRole'
      AssumeRolePolicyDocument:
        Version: '2012-10-17'
        Statement:
          - Effect: 'Allow'
            Principal:
              AWS: 'arn:aws:iam::${security_account}:role/awskillswitchExecutionRole'
            Action: 'sts:AssumeRole'

      Policies:
        - PolicyName: 'AllowSecuritySCPPolicy'
          PolicyDocument:
            Version: '2012-10-17'
            Statement:
              - Effect: 'Allow'
                Action:
                  - 'organizations:CreatePolicy'
                  - 'organizations:AttachPolicy'
                Resource: '*'
Now deploy the CloudFormation deploy within the organization management account:
aws cloudformation create-stack \
  --stack-name AllowSecuritySCPRoleStack \
  --template-body file://allow_security_scp.yml
  --capabilities CAPABILITY_NAMED_IAM \
  --parameters ParameterKey=security_account,ParameterValue={security_account}
Allow security account to detach policies from IAM roles
Since IAM roles cannot be created from the organization management account you will need to create a CloudFormation template and deploy it via StackSets. Let’s call the template allow_security_detach_role.yml:
AWSTemplateFormatVersion: '2010-09-09'
Description: 'Role to allow IAM role deletion by Security account'

Resources:
  AllowSecurityDetachRoleRole:
    Type: 'AWS::IAM::Role'
    Properties:
      RoleName: 'AllowSecurityDetachRoleRole'
      AssumeRolePolicyDocument:
        Version: '2012-10-17'
        Statement:
          - Effect: 'Allow'
            Principal:
              AWS: 'arn:aws:iam::${security_account}:role/awskillswitchExecutionRole'
            Action: 'sts:AssumeRole'

      Policies:
        - PolicyName: 'AllowSecurityDetachRolePolicy'
          PolicyDocument:
            Version: '2012-10-17'
            Statement:
              - Effect: 'Allow'
                Action:
                  - 'iam:ListAttachedRolePolicies'
                  - 'iam:DetachRolePolicy'
                  - 'iam:ListRolePolicies'
                  - 'iam:DeleteRolePolicy'
                  - 'iam:CreatePolicy'
                  - 'iam:ListRoles'
                  - 'iam:AttachRolePolicy'
                Resource: '*'
Create a StackSet that automatically deploys this role to any new or existing account in the organization. You can add actions to the inline policy if you would like to expand the set of actions that a Security principal can take:
aws cloudformation create-stack-set \
  --stack-set-name AllowSecurityDetachRole \
  --template-body file://allow_security_detach_role.yml \
  --capabilities CAPABILITY_NAMED_IAM \
  --permission-model SERVICE_MANAGED \
  --auto-deployment Enabled=true,RetainStacksOnAccountRemoval=false \
  --parameters ParameterKey=security_account,ParameterValue={security_account},UsePreviousValue=false
and deploy:
aws cloudformation create-stack-instances \
  --stack-set-name AllowSecurityDetachRole \
  --regions '["us-east-1"]' \
  --deployment-targets OrganizationalUnitIds='["{root_id}"]'
Create kill switch Lambda function
The Lambda function and client are available in the AWS Kill Switch GitHub repo. Clone the repo:
git clone https://github.com/secengjeff/awskillswitch.gitBefore compiling this function it is important to understand how it works and consider any changes that you might want to make before compiling. The function can be invoked with one of two sets of actions:
apply_scp: This action applies a highly restrictive SCP to a targeted account with the intent of protecting the account against malicious changes. Reviewswitch.confand determine whether any changes are needed for your unique case.detach_policies, revoke_sessions: The first action detach policies and deletes inline policies from an IAM role that you specify. The second action revokes all active sessions for the role from which the policies were detached or deleted.
Compile and zip a Linux binary:
cd awskillswitch
GOOS=linux GOARCH=amd64 go build -o main awskillswitch.go
zip main.zip main switch.conf
From the Security account, create an execution role and trust policy that will allow the Lambda function to run, assume roles, and perform the required set of actions. First, create an execution role called lambda_execution_role.json:
{
  "Version": "2012-10-17",
  "Statement": [
    {
      "Effect": "Allow",
      "Principal": {
        "Service": "lambda.amazonaws.com"
      },
      "Action": "sts:AssumeRole"
    }
  ]
}
And another called lambda_permission_policy.json:
{
  "Version": "2012-10-17",
  "Statement": [
    {
      "Effect": "Allow",
      "Action": "sts:AssumeRole",
      "Resource": "arn:aws:iam::*:role/*"
    },
    {
      "Effect": "Allow",
      "Action": [
        "logs:CreateLogGroup",
        "logs:CreateLogStream",
        "logs:PutLogEvents"
      ],
      "Resource": "arn:aws:logs:*:*:*"
    }
  ]
}
Now you can create the role, policy, and Lambda function:
aws iam create-role --role-name awskillswitchExecutionRole --assume-role-policy-document file://lambda_execution_role.json

aws iam put-role-policy --role-name awskillswitchExecutionRole --policy-name awskillswitchExecutionPolicy --policy-document file://lambda_permission_policy.json

aws lambda create-function --function-name awskillswitch --zip-file fileb://main.zip --handler main --runtime go1.x --role arn:aws:iam::{security_account}:role/awskillswitchExecutionRole --timeout 15 --memory-size 128
Testing
WARNING: These actions are one-way operations. Do not test/experiment in production. Any SCPs applied or policies detached or deleted will remain in this state until manual action is taken to remove the SCP or reattach policies. Ensure that you have the the ability to reverse these changes and incorporate the appropriate steps in your incident response playbooks.
The AWS Kill Switch README includes instructions on how to form a json payload that you can use to invoke the function directly from the AWS CLI or your own application. If using the AWS CLI, your command will look like:
aws lambda invoke --function-name awskillswitch --payload file://sample-payload.json response.jsonYou can also use the client described in the next section.
Create kill switch client
The AWS Kill Switch GitHub repo includes a client that you can use to invoke the Lambda function as an IAM user in the Security account:
cd awskillswitch/client

go build -o killswitchclient killswitchclient.go
You can now apply highly restrictive SCPs or detach IAM policies from the shell:
./awskillswitchclient -action apply_scp -lambda "arn:aws:lambda:us-east-1:{security_account}:function:awskillswitch" -target_account "123456789012" -role_to_assume "RoleToAssume" -org_management_account "998877665544" -region "us-east-1"This command will apply a highly restrictive SCP to the AWS account 123456789012 by assuming RoleToAssume in AWS account 998877665544 using the awskillswitch Lambda function deployed to us-east-1.
./awskillswitchclient -action detach_policies -lambda "arn:aws:lambda:us-east-1:{security_account}:function:awskillswitch" -target_account "210987654321" -role_to_assume "RoleToAssume" -target_role "RoleToDetach" -region "us-east-1"This command will detach policies and delete inline policies from the IAM role RoleToDetach in AWS account 210987654321 by assuming RoleToAssume in the same account using the awskillswitch Lambda function deployed to us-east-1.
Detaching and deleting inline policies does not affect pre-existing session tokens. To revoke a session token you have to apply an invalidation policy that includes a condition based on token issue time. The kill switch makes this easier by providing a revoke_sessions action that automatically creates and attaches this policy. You can target a specific role:
./awskillswitchclient -action detach_policies -lambda "arn:aws:lambda:us-east-1:{security_account}:function:awskillswitch" -target_account "210987654321" -role_to_assume "RoleToAssume" -target_role "RoleToRevokeSessions" -region "us-east-1"or you can revoke every active session across customer managed roles by specifying ALL instead of a specific role:
./awskillswitchclient -action detach_policies -lambda "arn:aws:lambda:us-east-1:{security_account}:function:awskillswitch" -target_account "210987654321" -role_to_assume "RoleToAssume" -target_role "ALL" -region "us-east-1"The policy is dynamically named so that you can take this action as many times as you like during a security incident (subject to IAM quotas).
Next Steps
You now have an AWS organization with two administrative accounts that govern each member account and organizational unit. Your Organization Management account allows you to automate changes to any or all accounts using StackSets or place broad access restrictions using SCPs. Very few people (or systems) should have access to this account. Your Security account centralizes security controls, logging buckets, and Security Hub, which makes it easier for security engineers in your organization to monitor and respond to security incidents. CloudTrail and GuardDuty record every action taken on accounts in your organization and forward alerts that indicate potentially malicious to Security Hub. Your new Vendors Organizational Unit (OU) provides you with way to group, monitor, and limit actions taken on accounts that are used by external entities, like your vendors. This ensures that vendor managed applications are covered by the same security controls you use for all accounts in your organization. The AWS Kill Switch Lambda function running in the Security account is a powerful tool that provides your incident response team with the ability to take restrictive actions like detaching or deleting policies, deleting roles, revoking sessions, or applying SCPs to any account in your organization.
Security is never “done.” This solution provides the basic mechanisms for centralizing security controls, safely integrating vendor applications, and containing security incidents. You should also:
Collaborate with your procurement team to develop new contract language and externally facing guidance to vendors on expectations for building on AWS accounts provided by your organization.
Review the README for the AWS Kill Switch in collaboration with your incident response team and decide how you will respond to and contain security incidents. These decisions should be incorporated into incident response playbooks and optionally integrated with incident response automation tooling.
Consider incorporating other AWS services that make it easier to review security logs and findings vs. searching S3 buckets, like AWS CloudTrail Lake, Amazon Security Lake, or Amazon OpenSearch Service. If you’re using a (non-AWS) SIEM you should consider ingesting these logs and findings to centralize them in accordance with your existing standards. Ensure that log and finding retrieval practices are incorporated in your playbooks and that incident responders are familiar with the use of these tools.
Ensure that you have a comprehensive vulnerability management strategy that covers your cloud infrastructure. If you’re all in on AWS you can use AWS Config and Amazon Inspector for posture management and OS vulnerability scanning. You can also use GuardDuty for runtime monitoring on EC2 instances and ECS or EKS containers. Multi-cloud organizations or AWS developers who want a greater breadth of features can consider using a third-party cloud native application protection platform (CNAPP), like Wiz (the only CNAPP this author currently recommends).
Assess all of your security controls and practices against the AWS best practices for security, identity, and compliance and build a comprehensive security roadmap in collaboration with your product and engineering partners.
You can also check out Ashwin Phadke’s (Sr. Solutions Architect, AWS) conceptually similar (and far more concise) solution that provides three different options for providing SaaS vendors with access to your secure environment if you are looking for something less complex.